Task:
Create Red Hat exam "LiveUSB" boot stick from Red Hat Remote Exam ISO file.
Multiple supported USB live-boot imaging options:
- Download and install the FedoraMediaWriter
- Use the built in dd utility of Mac OS - these instructions
- Use the BalenaEtcher Mac or Windows program
WARNING: Very poor results using the Red Hat supplied iso:
- BalenaEtcher both had errors trying to make an USB image using multiple branded USB sticks on both our Intel PCs and Macs. MS Windows BalenaEtcher complained of with a program array error. On Mac it complained there was an error reading the iso. We downloaded the iso several times, and the results were the same.
- Only the FedoraMediaWrite program and the dd Terminal program on either Intel or Silicon/ARM Macs could complete the imaging from any of the rhre-20260209.iso downloaded files to any of the USB sticks. (Not that any actually booted successfully.) In all of the cases using FedoraMediaWrite and dd, the folder structure looked correct for a boot image. So it looked like a "good" image.
- On our workstation PCs with Intel and LSI motherboards, we could load the EFI image and start the boot, but could not complete the boot after the boot menu - errors: GRUB2: error: disk '(hd0,)' not found, and grub-core hd0,gp54, you need to load the kernel first errors.
- We next tried various Intel MacBooks 2012 through 2018; the older macs also gave similar errors, but would boot to a Username and Password prompt. They did NOT boot to the normal UI.
- We next tried our Ubuntu workstation, and it booted the EFI but failed as well with the grub-core error, regardless which USB stick we tried.
- We then tried booting via vSphere and Intel Macs running VMware Fusion the direct ISO, in all cases, the iso was ignored.
- We then tried booting via vSphere and Intel Macs VMware Fusion from the USB sticks, in all cases, the USB stick was either ignored, and the boot manager was presented, or it failed with the GRUB2 error.
- We then tried booting via vSphere with Generic 64bit linux empty VM with both the iso on client device, and in the ISO NAS storage, and both were ignored as not present
- We then loaded a GPARTD live ISO and it booted on the Intel and LSI PC workstations regardless if they had MS Windows or Ubuntu normally running, it booted on all the Intel Macs pre 2024, and it booted in VMware Fusion (Intel macs) and in vSphere.
- We then loaded a Ubuntu live USB image and it booted on the Intel and LSI PC workstations regardless if they had MS Windows or Ubuntu normally running, it booted on all the Intel Macs pre 2024, and it booted in VMware Fusion (Intel macs) and in vSphere.
- We then used Fedora Media Writer and Mac dd (even though only MS Windows is listed on the RockyOS page) and created a new RockyOS image, it booted on the the older (pre-2024) Intel Macs, the Intel and LSI PCs, and VMware Fusion (Intel Macs), and in vSphere.
Prerequisites:
- You are getting ready to take an exam and need the required OS environment
- You have the Exam Prep PDF instructions
- The nearest testing location is couple hours or more away, so you decide to opt for remote option
- You have downloaded the ISO image: rhre-20260209.iso (link is in the PDF below)
- You think this will be simple, just like the Ubuntu, vSphere, and RockyOS USB images you've created in the past...
As of 2026/06, the PDF is found at:
www.redhat.com/rhdc/managed-files/tr-remote-exams-preparation-ebook-f27382-202103-en_1.pdf
Choose:
Steps for dd command
or
Steps for FedoraMediaWriter
Steps for dd Command:
1. Prep for USB writing:
a. Login to your MacOS
b. Run the Terminal utility app.
(Applications --> Utilities --> Terminal)
c. In the terminal window, list the disk devices:
-bash-3.2$ /usr/sbin/diskutil list
<review the list of disks take note of the devices and the current disk numbers>
/dev/disk0 (internal, physical):
#: TYPE NAME SIZE IDENTIFIER
0: GUID_partition_scheme *1.0 TB disk0
1: Apple_APFS_ISC Container disk1 524.3 MB disk0s1
2: Apple_APFS Container disk3 994.7 GB disk0s2
3: Apple_APFS_Recovery Container disk2 5.4 GB disk0s3
/dev/disk3 (synthesized):
#: TYPE NAME SIZE IDENTIFIER
0: APFS Container Scheme - +994.7 GB disk3
Physical Store disk0s2
1: APFS Volume Macintosh HD 11.2 GB disk3s1
2: APFS Snapshot com.apple.os.update-... 11.2 GB disk3s1s1
3: APFS Volume Preboot 7.2 GB disk3s2
4: APFS Volume Recovery 1.0 GB disk3s3
5: APFS Volume Data 567.7 GB disk3s5
6: APFS Volume VM 11.8 GB disk3s6
Notes:
- In the case of this example Mac, there is /dev/disk0 and /dev/disk4
- When we insert the USB stick to overwrite, it will not be one of these device disks.
d. Insert the USB stick:
- If the USB causes a Finder window to open, close the window. We don't want the USB stick in use.
e. In Terminal, rerun the list:
-bash-3.2$ /usr/sbin/diskutil list
<review the list of disks take note of the devices and the current disk numbers>
Notes:
- Note the new dev/disk<N> listed
- For the purposes of this document, we are going to assume that USB stick is /dev/disk5
2. Perform the LiveUSB creation:
a. Unmount the USB stick:
-bash-3.2$ /usr/sbin/diskutil unmountDisk /dev/disk5
<check message>
b. Confirm the USB is unmounted:
-bash-3.2$ /usr/sbin/diskutil list
<confirm the USB stick's status>
c. Create the Live USB:
-bash-3.2$ sudo dd if=/Users/<myid>/Downloads/rhre-20260209.iso of=/dev/disk5 bs=512
<enter password>
- Answer Prompts:
- It is likely that you will be prompted twice to Allow the format; once for the Downloads folder, and once for the Removable Volume (/dev/disk5) overwrite. Answer Allow for both.
- Wait for the process to finish. It will like take a minute to several minutes.
3. Try out the Live USB on your desired PC or MacOS (Intel-only) workstations
a. Login to the Mac that you want to try out.
- Ensure it has only one Monitor
- Ensure it has only one wired keyboard and mouse
- Ensure it is plugged into power (if Macbook)
- Ensure it has a wired microphone and a wired web cam. The web cam must have a cable minimum 1m long so that inspection can occur.
- Ensure anything else is removed
b. Insert the USB
c. Power icon --> Restart
d. Hold the left or right Option key
Notes:
- If you have a MS keyboard w/your mac, hold down the Alt button
- Choose the EFI option or its arrow
e. Login using the Red Hat Developer or Customer login
f. Does everything work?
- Did it boot okay into the USB stick?
- Does the wired keyboard and mouse work?
- Does the monitor still work?
- Does the microphone and camera work?
Run the Linux Terminal, confirm that various commands and programs work that will be needed for the exam.
---
Steps for FedoraMediaWriter on Mac OS:
1. Download FedoraMediaWriter:
github.com/FedoraQT/MediaWriter --> releases --> <latest release number (e.g. 5.3.1)>
Download the desired version:
e.g.
FedoraMediaWriter-macos-5.3.1.dmg
FedoraMediaWriter-macos-arm64-5.3.1.dmg
FedoraMediaWriter-win64-5.3.1.exe
Note:
- Choose the macos- arm64 for a silicon M-series Mac, or without just macos w/o arm64 for an Intel-based back, or win64 version for MS Windows 10 or 11
2. Run the installer dmg file:
a. Double click the dowloaded dmg (e.g. FedoraMediaWriter-macos-arm64-5.3.1.dmg)
b. In the pop-up window, Drag and drop the FedoraMediaWrite program to the desired location (e.g. main system-wide Applications folder)
3. Run/fix the FedoraMediaWriter program in the Applications folder:
a. Run and typically there will be an error:
"FedoraMediaWriter is damaged and cannot be opened"
Note:
- This is typically do the macOS Gatekeeper quarantine protection. If you downloaded this install from the official github location above, let's mark it safe:
(assuming installed to the main Applications folder)
b. Remediate with:
- Open Terminal (Applications --> Utilities --> Terminal)
-bash-3.2$ cd /Applications
-bash-3.2$ sudo xattr -c FedoraMediaWriter.app
<enter password>
c. Rerun FedoraMediaWriter in the Applications folder:
- Under Select Image Source (heading), choose: Select .iso file
- Click Next (button)
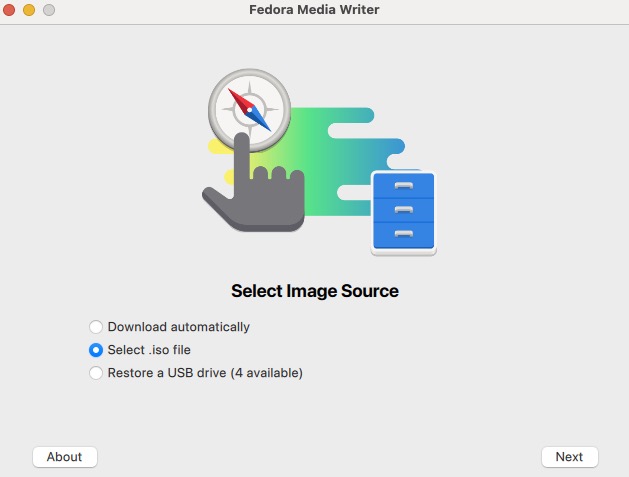
- Under Write Options (heading), click Select... (button) --> navigate to the rhre-yyyymmdd.iso file --> click Open (button) to select and return.
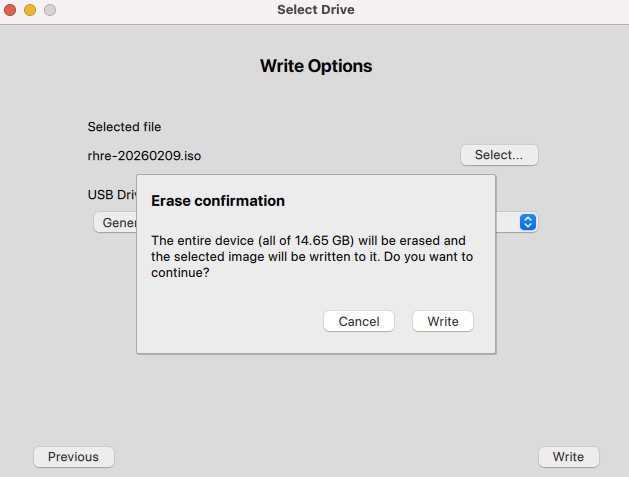
- Under USB Drive, click the dropdown and CAREFULLY select the USB stick, paying great attention to sizes
- Click Write (button)
- In the Erase confirmation pop-up, click Write (button)
- In the authopen system pop-up dialog, enter your macOS user name and password
- click OK (button)
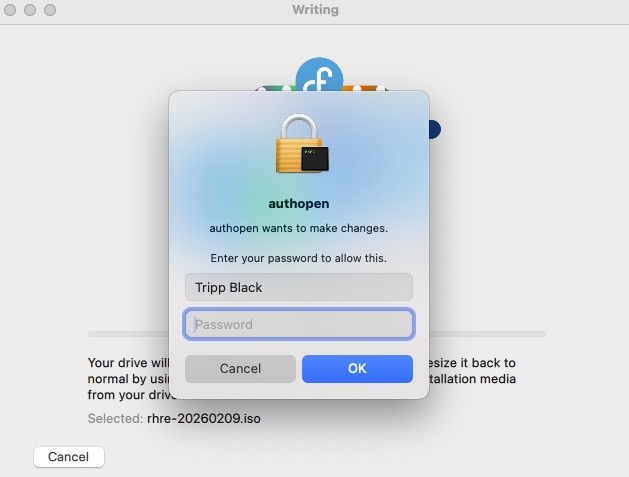
- Wait until the image write is completed
---
previous page
|