Steps to Install WordPress into ISPConfig3 Web Site:
1. Create a new web site for the customer if you haven't done so already.
ISPConfig --> Sites (tab) --> Websites (heading) --> Website
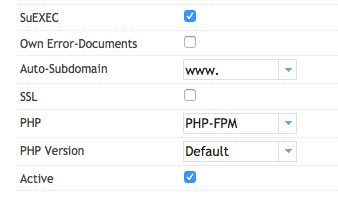
2. Update the Web Site settings, ensure the suEXEC is checked. Also set PHP to PHP-FPM.
PHP Notes:
PHP Set-up: We tried Mod-PHP, but that didn't work. Fast-CGI with SuEXEC, and PHP-FPM with SuEXEC are the only ones that work.
Watch for PHP Version issues, Mindwatering has 5.6, 7.1, and 7.2.x installed (as of 2018/12). Certain versions of WP and their plugins will require or perform faster/more reliably with different versions of PHP. Compatibility guarantees from plug-in makers are nebulous, at best.
On the Options tab, add the following custom php.ini settings:
post_max_size = 48M
max_input_vars = 1200
upload_max_filesize = 24M
max_execution_time = 300
memory_limit = 256M
Make sure you have cURL and PHP-CURL installed.
$ sudo apt-get update
$ sudo apt-get upgrade curl curl-php
If you see, ... already newest version ..., then you should be good to go.
If you didn't, restart apache (or nginx).
$ sudo service apache2 restart
WP's image compression plugins require some libraries to be installed:
$ sudo apt-get install optipng gifsicle libjpeg-progs
Note: jpegtran is located w/in libjpeg-progs.
3. Confirm that customer account has a SSH Login for FTP login set-up.
This way we can transfer WordPress to the customer's web folder.
4. Create a database for WordPress.
a. Create a new database user:
ISPConfig --> Sites (tab) --> Databases (heading) --> Database Users
Click the Add User button.
Complete the form entering the client account, the new user ID, and its password.
Click Save.
Note the ID name, you'll need it for the database creation next, and the WordPress setup.
b. Create the new database:
ISPConfig --> Sites (tab) --> Databases (heading) --> Databases
Click the Add new Database button.
Notes:
-Note the Database name, you'll need it for the WordPress setup.
- Before creating the database, check wp-config.php for database type. The newer versions have been UTF-8MB4. You cannot change the database charset after creation.
Complete the form selecting the site, keeping MySQL, entering a database name, choosing the database user just created, and changing charset to UTF-8, or UTF-8MB4
Click Save.
5. Install WordPress on the site:
a. Download the current version of Wordpress, from the WordPress.org web site.
https://wordpress.org/
Click any of the big buttons that say Download Wordpress 4.5.3 (where the numbers are the latest release).
b. Expand/unzip the Zip archive to a temporary folder w/in your Downloads folder.
(On Mac, we just scan for virus, and we double click to unzip.)
c. Using a File Transfer program, like Filezilla, log into the customer web site and transfer the entire folder to the root "web" folder for the customer. (e.g. /web)
Make sure you copy both the "root" files to the root directory /web, and the 4 folders (wordpress, wp-admin, wp-content, and wp-includes) into the /web folder. With FileZilla, we simply grabbed everything INSIDE the temp folder and dragged inside the /web folder and waited while everything transferred.
d. Check the File Permissions. Make sure the files are 744 or 755, the folders should import with 755 for their permissions. We've had problems with WordPress unless some PHP files are are 755, as well. But start with better security and loosen as you have to do so. If you make an upload(s) folder, make the upload folder 777 or there are issues with uploading images and files into WordPress from it.
e. In the root /web folder, copy the wp-config-sample.php to wp-config.php. Make sure the file permissions are 777 temporarily. This way WordPress can update the file for its set up. Once the set up is complete, change it to 775.
In the wp-config.php file, we need to update the key lines, where it says: 'put your unique phrase here'. Each key is different, and can be generated at the WP web site: api.wordpress.org/secret-key/1.1/salt/
Replace the generated key lines with the generated keys.
f. Update/create the .htaccess file in the /web folder. Add the following line:
DirectoryIndex index.php index.html
Save the updated file.
If created remotely, transfer the .htaccess file into the /web folder. The file permissions default to 644.
Note: For good measure, we also renamed the stock ISPConfig3 index.html file to index-old.html.
6. Perform WordPress set-up.
a. Open your preferred web browser. Navigate to your web site, adding the wp-admin folder. e.g. http://mydomain.com/wp-admin/.
Note: You actually don't need to do the folder, the index.php should redirect you.
b. WordPress presents you with the form to do two things: Connect it to the database you created, and create a WordPress admin user.
Enter the name of the new WordPress site, enter the database name and the database user you created earlier in step 4, enter the login ID of the new WordPress admin user, and enter its password. The wizard also asks you to enter your e-mail address for notifications.
If you have the file permissions on the copied wp-config.php file okay, you will see a success message and you are now good to go. Just change the wp-config.php file back to 755.
If you see a message telling you to copy everything into your config.php because it couldn't, then do so and manually update the file. Note the hashed password.
Before you install any plugins, increase the resources that WP can give it's plugins. It is extremely rare that the WP defaults (40 MB) are Update the wp-config.php file with the following below. Make sure they are added JUST below the DEGUG line. If you put it at the very bottom, the variables won't work. You also have to make sure they are uppercase, too. WP variables are case sensitive, meaning, they won't work unless in UPPERCASE.
$ sudo vi wp-config.php
...
*/
define('WP_DEBUG', false);
define('WP_MEMORY_LIMIT', '128M');
define('WP_MAX_MEMORY_LIMIT', '256M');
set_time_limit(300);
...
<esc> :wq
(to save)
Notes:
- If you are using a ThemeForest plugin like Avada, their minimum requirements are below what's needed even for their demo installs. See the other note in this app for increased time-out, and memory allocations needed for Avada. For example, for a minimum theme requirement of 64M, make sure you specify at least 1024M. We had one that wouldn't run for more than one web visitor unless we increased to 2048M. To support more than 10 concurrent users (10/second), we increased to 4096M, which seemed to be sufficient.
- The PHP versions get updated with the OS updates. As of 2021/08, MW currently has the default (current) PHP/system version as 7.4.x. Each version of PHP needs to be updated after the new version is installed with system increases in the php.ini. This needs updating due to PHPMyAdmin only having 2MB upload of SQL backups.
Steps:
Open up the current PHP configuration file:
$ sudo vi /etc/php/7.4/apache2/php.ini
(Use the "/" to find each entry.)
...
max_execution_time = 90
max_input_time = 120
memory_limit = 256M
...
post_max_size = 100M
To save:
<esc>:wq <enter>
previous page
|