Task:
Create a Sametime System Console (SSC) based on 64bit CentOS 7.
Steps.
1. Created VM with 1CPU (2 CPU better), and 3GB RAM.
2. Installed CentOS 7 ( CentOS-7-x86_64DVD-1511.iso )
3. Install options:
a. Auto Partition
b. Setup NIC with static IP, with gateway, and DNS.
c. Server with GUI
d. Added Compatibility Libraries
e. Created root user and admin user.
f. Open ports 22 and 50000 (for db2)
$ su -
# firewall-cmd --zone=public --add-port=22/tcp --permanent
# firewall-cmd --zone=public --add-port=50000/tcp --permanent
# firewall-cmd --zone=public --add-port=8600/tcp --permanent
# firewall-cmd --zone=public --add-port=8700/tcp --permanent
# firewall-cmd --zone=public --add-port=9060/tcp --permanent
# firewall-cmd --zone=public --add-port=9043/tcp --permanent
# firewall-cmd --zone=public --add-port=8701/tcp --permanent
# firewall-cmd --zone=public --add-port=9080/tcp --permanent
# firewall-cmd --zone=public --add-port=9443/tcp --permanent
4. Fix the wired network is started.
a. First let's turn it on. From the menu, choose System Tools --> Settings
Choose Network. Move to On if off.
b. Now let's fix it.
From the menu, choose System Tools --> Terminal
$ su -
<enter root password>
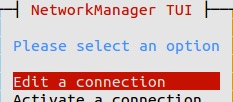
# nmtui
In the NetworkManager TUI screen, select Edit a Connection.
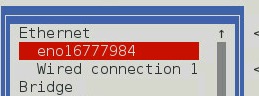
Select the wired ethernet connection (e.g. eno12345678).
On the Edit Connection page, tab down to the bottom of the screen (using the tab key repeatedly).
When you tab into the Automatically connect field, press the space bar to mark / check the box.

Confirm Available to all users is also checked.
Tab to the OK and then press the Enter button to return to the list of wired connections.
Tab down to Quit and press the Enter button to leave the utility.
5. Installed Open VM Tools (Login first).
a. From the menu, choose System Tools --> Terminal
$ su -
<enter root password>
# yum update
<it will check repositories and want to upgrade packages, answer Y >
6. Get your files from the IBM (Lotus) Passport site.
You want all of these...
IBM WebSphere Application Server Network Deployment V8.5.5 (1 of 3) for Multiplatform Multilingual (CIK2HML) - WAS_ND_V8.5.x_1_OF_3
IBM WebSphere Application Server Network Deployment V8.5.5 (2 of 3) for Multiplatform Multilingual (CIK2IML) - WAS_ND_V8.5.x_2_OF_3
IBM WebSphere Application Server Network Deployment V8.5.5 (3 of 3) for Multiplatform Multilingual (CIK2JML) - WAS_ND_V8.5.x_3_OF_3
IBM WebSphere V8.5.5 iFixes for IBM Sametime V9.0 Windows, x86 Linux, AIX, IBM i Multilingual (CIQ6JML)
IBM Installation Manager V1.6.2 for Linux x86_64 (required to install WebSphere Application Server V8.5.5), Multilingual (CIK2GML)
IBM DB2 10.1 - Limited Use for Linux on AMD64 and Intel EM64T systems (x64) Multilingual (CI6TQML)
IBM Sametime System Console Server V9.0 Windows, X86 Linux, AIX, IBM i Multilingual (CIQ4CML) - ST_Console9_Win_x86_AIX-IBMi.zip
Transfer them to your server via SFTP (e.g. FileZilla).
Not included on this server:
IBM Sametime Community Server Limited Use V9.0 AIX, Linux Multilingual (CITN3ML)
7. Disable SELINUX.
# vi /etc/selinux/config
<update the SELINUX= line to SELINUX=DISABLED, and save>
8. Install IBM Installation Manager.
a. Expand IBM_Install_Mgr_V1.7.1_L64Bit_ML.zip into it's own folder.
(otherwise you'll have lots of files in with your other install archives).
# cd /home/sysadmin/Downloads/tmp
# unzip IBM_Install_Mgr_V1.7.1_L64Bit_ML.zip
# ./install
Follow prompts to install to default location under /opt/.
9. Preparation for DB2 installation.
# cd /home/sysadmin/Downloads
# mkdir dtmp
# mv IBM_DB2*.gz dtmp/
# tar -zxvf IBM_DB2*.gz
# cd dtmp/wser/
10. Install DB2 64-bit Limited Ed.
# ./db2setup
<The DB2 Setup Launchpad window is loaded)
Click the Install a Product menu option on the left.
Under DB2 Workgroup Server Edition Version 10.1, click Install Now.
<The DB2 Setup - DB2 Workgroup Server Edition window is launched>
Click Next.
Select to accept the license terms, and click Next.
Select Typical, if not already selected, click Next.
Select Install DB2 Workgroup Server Edition on this computer (first option), click Next.
Confirm the install location, click Next.
Change the dasusr1 user selection to create a New user, db2admin, enter a Password for db2admin, Confirm Password, click Next.
Click the Radio button to create a DB2 instance.
Keep the selection to create a New user, db2inst1, enter a Password for db2inst1, Confirm Password, click Next.
Keep the selection to create a New user, db2fenc1, enter a Password for db2fenc1, Confirm Password, click Next.
On the Set up Notifications screen, under Set up your DB2 server to send notifications, enter your Notification SMTP server's address, click Next.
On the Specify a contact for health monitor notification page, enter your admin monitoring e-mail address, click Next.
On the Start copying files page, review the selections and click Finish to install.
Wait while the Installing DB2 Workgroup Server Edition window is installing DB2, review the user connection info when presented, click Finish.
11. Post DB2 Install Tasks
a. Set DB2 to start with system.
# cd /opt/ibm/db2/V10.1/bin/
# ./db2iauto -on 'db2inst1'
Log out of your normal login ID.
b. Apply any patches desired.
Log out. Log back into the server as db2inst1.
Applications --> IBM DB2 --> Check for DB2 Updates.
If you have updates, the Messages screen will give you the FP version to download. Once you download it, you can install it.
Log out. Log back into the server with your primary admin or root ID.
Note: Alternate startup, using db2inst1 user if step 'a' above doesn't work.
# su db2inst1
$ db2greg -getinstrec instancename='db2inst1'
Note:
If you want to manually start DB2
$ su db2inst1
$ db2start
If you manually stop DB2
$ db2stop
If you had an error during the STC installation and now it's stuck, you can drop the database and start over:
$ su - db2inst1
$ db2 drop database STSC
c. WARNING: On RedHat 7, the db2 services may still not start because the start-up is via inittab, which is no longer supported. If this is the case perform the following.
Comment or remove the db2 exec line from the bottom of the file if it is there.
# vi /etc/inittab/
# < edit and comment out the fmc:2345:respawn:/opt/ibm/db2/V10.1/bin/db2fmcd line. >
Review the attached init script that Nick I. made (search GitHub for the original). If you like it, you can use this as a workaround until IBM fixes in a future release.
 db2_rhel db2_rhel
SFTP this file to server and move to the /etc/init.d/ location.
# mv db2_rhel /etc/init.d/db2
# chown root:root /etc/init.d/db2
# chmod u+x /etc/init.d/db2
# systemctl enable db2
Try out the init script:
# service db2 stop
# service db2 start
12. Set-up local and Passport repositories for the WAS install.
a. Prep the WAS files.
Locate the WASND_v8.5.n_1_of_3.zip , WASND_v8.5.n_2_of_3.zip, and WASND_v8.5.n_3_of_3.zip.
(Where "n" is the newest point release to download.) Extract each one into its own folder.
# cd /home/sysadmin/Downloads
# mkdir wtmp
# mv WAS*.zip wtmp/
# unzip WASND_8.5.n_1_of_3.zip
# unzip WASND_8.5.n_2_of_3.zip
# unzip WASND_8.5.n_3_of_3.zip
b. Open IBM Installation Manager as root user.
Applications --> IBM Installation Manager --> IBM Installation Manager
Note: IBM Installation Manager needs to run with Administrative Privileges, logout and log back into the server as root.
c. Add local repository.
File --> Preferences
Click Add Repository, click Browse.
Browse to the Downloads w/wtmp folder and select the repository.config document. Click Apply / OK.
13. Install WAS.
Back at the main menu, click the Install option.
Select IBM WebSphere Application Server Network Deployment 8.5.n and click Next.
Select any fixes available, click Next.
Accept the license terms, click Next.
Verify the install directory, change if needed (usually take default), click Next.
Verify the language, click Next.
Verify that Websphere Application Server Full Profile is checked. Verify that 64-bit WebSphere SDK for Java is also checked.
Click Install, and wait.
BEFORE clicking FINISH at the end of the install, change the profile to create to None, click Finish.
Note: If you didn't click the option to install updates with the original install, install them now.
Back at the main menu, click Update. Click the check-box to Update all packages with recommended updates and recommended fixes.
Click Next.
On the Update Packages page, review the packages being updated, and click Update.
14. Preparation for Sametime Console installation.
a. Prep the zip file for installation:
# cd /home/sysadmin/Downloads
# mkdir sttmp
# mv ST_Console*.zip /sttmp
# unzip ST_Console9_Win_x86_AIX_IBMi.zip
b. Add local repository.
Applications --> IBM Installation Manager --> IBM Installation Manager
File --> Preferences
Select the WAS install repository. Click Remove Repository.
Click Add Repository, click Browse.
Browse to the Downloads w/sttmp folder and select the repository.config document within the SSC folder. Click Apply / OK.
( /home/sysadmin/Downloads/sttmp/SametimeSystemConsole/SCC/ )
c. Create the ST database.
Move the SametimeSystemConsole extracted files to a place where db2inst1 user can access them.
# cd /home/sysadmin/Downloads/sttmp/
# cp -R SametimeSystemConsole/ /home/db2inst1/Downloads/
# chown -R db2inst1 /home/db2inst1/Downloads/SametimeSystemConsole/
# chmod -R u+rwx /home/db2inst1/Downloads/SametimeSystemConsole/
Log out. Log back into the server as db2inst1.
Start a terminal window: Applications --> Utilities --> Terminal.
(Alternately, you can issue a su db2inst1 command)
$ cd /home/db2inst1/Downloads/SametimeSystemConsole/DatabaseScripts/SystemConsole/
$ ./createSCDb.sh STSC dasusr1 (or db2admin depending on DB2 install above)
<wait - typically takes a few minutes>
$ exit
Log out db2inst1.
15. Install the Sametime Console (SSC).
Log back into the machine as the admin or root user.
Start the Installation Manager: Applications --> IBM Installation Manager --> IBM Installation Manager
Back at the main menu, click the Install option.
Select IBM Sametime System Console server and click Next.
Select any fixes available, click Next.
Accept the license terms, click Next.
Verify the install by clicking the Validate button. When successful, the button will change to Validated, click Next.
Verify the WAS location, click Next.
On the WAS Configuration tab, confirm the Cell, Node, and FQDN / Host Name are correct, scroll down.
example:
Cell: mwstSSCCell
Node: mwstSSCNode
Host Name: mwstc.mindwatering.com
Under Create the administrative ID and password ... heading, leave the ID as wasadmin, and enter a password, and confirm the password.
Click Next.
On the Configure DB2 tab, enter the FQDN of the DB2 server (this server), leave the ID as db2admin, and enter its password, and confirm the password.
Host Name: mwstc.mindwatering.com
Port: 50000
Database Name: STSC
Application user ID: dasusr1
Click Validate at the bottom of the page. When successful, the button will change to Validated, click Next.
<wait for the Progress Information window to complete - it is downloading updates>
Click Install.
Click Finish at the end of the install.
16. Open Firefox on "this" server and bring up Websphere Integrated Solutions Console
a. Bring up web site:
URL: http://mwstc.mindwatering.com:8700/admin/
(Note: This will redirect to https on port 8701.)
At the security warning, choose I understand the Risks, click Add Exception, and Confirm Security Exception to create a permanent exception for this site.
At the login, enter: wasadmin and the password you created in step 15 above.
b. On the main page, confirm that both Websphere and the SSC are installed and can be administered via this web site:

17. Set-up LDAP to the Domino Server.
a. At the bottom of the menu on the left, choose:
Sametime System Console --> Sametime Prerequisites --> Connect to LDAP Servers
On the right, under Connect to LDAP Servers, click the Add button.
You need to know your LDAP (Domino) source, and the login information you are going to use.
e.g. mail1/MWNet, LDAP Admin, on port 389.
Deployment Name: DominoLDAP
Host Name: mail1.mindwatering.net
Port: 389
Bind distinguished name (DN): LDAP Admin
Password: *********
Click Next.
Do NOT complete the LDAP base entry. Click Next.
Review the settings, click Finish.
b. Restart STConsoleServer app server and node agents.
On the left menu, choose:
Servers --> Server Types --> WebSphere application servers
On the right, under Application servers, click the check-box to the left of STConsoleServer, click the Stop button.
On the Stop server page, click the check-box to not show the message again, click OK.
On the Server status feedback page, click OK after the page successfully says the server stopped successfully.
On the left menu, choose:
System administration --> Node agents (NOT just Nodes)
Beside nodeagent, click its check-box, then click Stop.
<wait to see the successful stop message at the top of the page>
On the left menu, choose:
System administration --> Deployment manager
On the right, under Deployment manager, click the Stop button.
On the Stopping Server warning page, click OK.
c. Restart the SSC services.
# reboot
If you really want to manually (re)start them:
# cd /opt/IBM/WebSphere/AppServer/profiles/STSCDMgrProfile/bin/
# /startManager.sh
<wait>
# cd /opt/IBM/WebSphere/AppServer/profiles/STSCAppProfile/bin/
# /startNode.sh
<wait>
18. Increase "Heap" size.
a. Login to the admin site again, with your wasadmin ID.
URL: http://mwstc.mindwatering.com:8700/admin/
(Note: This will redirect to https on port 8701.)
b. On the left menu, choose:
System administration --> Deployment manager
On the right, under Server Infrastructure, open the + twistie for Java and Process Management, and select Process definition.
On the far right, under Additional Properties, select Java Virtual Machine.
Under General Properties, several fields down, change the Maximum heap size from 512 to 2048, click OK.
Under the Deployment manager heading, is a new message indicating that you've made a change, click Save.
Restart the SSC services again.
# reboot
19. Create a Deployment Profile for the Existing Domino Server within Sametime System Console (SSC).
Note:
These instructions are assuming that:
- You have another server with Sametime 9.x on linux in a 32bit VM called mwsametime.mindwatering.com.
- Domino and Sametime are already installed and running, and that we are going to add it to be managed by our new SSC.
a. Login to the admin site again, with your wasadmin ID.
URL: http://mwstc.mindwatering.com:8700/admin/
(Note: This will redirect to https on port 8701.)
b. On the left menu, choose:
Sametime System Console --> Sametime Guided Activities --> Install Sametime Community Server
Under Install Sametime Community Server, enter a Deployment Name.
e.g. MWSametime
Click Next.
Under Product Version, select the Sametime Product Version installed.
e.g. 9.0.0
Click Next.
Under Connect to Domino Server, enter the following information from your Sametime server:
Host Name: mwsametime.mindwatering.com
Port: 80
Domino User ID: LDAP Admin
Password: ********
Click Next.
Under Connect to an LDAP Server, select the radio button for DominoLDAP that we configured above. Click Next.
Under HTTP Tunnelling, click the check-box ONLY IF you have tunneling enabled. Click Next.
Under Deployment Summary, review the set-up, click Finish.
20. Register / Add the Sametime Community Server to the SSC.
Note:
This section is based on IBM Sametime 9.0.0 documentation on Registering the Sametime Community Server with the Sametime System Console.
a. Get the STSCAppProfile profile information to use for registering the Sametime Community server.
# cd /opt/IBM/Websphere/AppServer/profiles/STSCAppProfile/logs/
You should retrieve the following:
Profile: STSCAppProfile
Node: mwstcSSCNode
Host: mwstc.mindwatering.com
Admin console port: 9060
Admin console SSL port: 9043
HTTP transport port: 9080
HTTPS transport port: 9443
Bootstrap port: 2809
SOAP port: 8880
b. Log into the Sametime community server.
(notesuser if on Linux)
c. Locate the console folder:
(e.g. e:\IBM\Domino\console\ on MS Windows, or /local/notesdata/console)
# su - notesuser
$ cd /local/notesdata/console/
$ cp console.properties console.backupproperties
$ cp productConfig.properties productConfig.backupproperties
$ vi console.properties
Update the following lines:
SSCHostName --> mwstc.mindwatering.com
SSCUserName --> wasadmin
SSCPassword --> **********
Note: The SSCUserName and SSCPassword will be replaced with a new field SSCEncodedAuthorization with a hashed key.
Optional:
SSCSSLEnabled --> true
$ vi productConfig.properties
Update the following lines:
NodeHostName --> mwsametime.mindwatering.com (This is the Sametime server's FQDN.)
DepName --> MW Sametime Community 1 (This is a title you give the Sametime server, it's displayed in the SSC.)
d. Note the path to the Community server's notes.ini.
$ ls/local/notesdata/notes.ini
e. Register the Sametime Community server with the SSC.
Note: Both the SSC and the Sametime Community server's services need to be running for this to work.
$ ./registerSTServerNode.sh
When it asks you . . .
"Please specify the location of the notes.ini file." Answer:
/local/notesdata
"Please specify the domino administrator user name." Answer:
LDAP Admin
"Please specify the domino administrator password." Answer:
***********
Note:
If you get an error that it didn't completely initialize, you probably entered the whole path for notes.ini, just do the folder path without the filename and the trailing slash.
If you get an error that your login was not successful, and it's after the LDAP settings, this is not the Domino credentials you entered, but the wasadmin login. However, once you check the login credentials, and you find them correct, look towards the firewall on the new ST SSC server, you probably left out 9443 or 9080 (depending on if you have SSL enabled).
f. Restart your Sametime community server, and it should now be under the SSC's management.
On the Sametime community server, use the service you installed to reboot the Domino services.
# service domino stop
# service domino start
(Console "rest server" is not recommended by the Sametime team, they evidently want to make sure nothing remains.)
Other Notes:
Run all upgrades from w/in IBM Installation Manager; including itself. Much easier than downloading from Fix Central.
Before starting IBM Installation Manager, shut down the WAS and DB2 services.
# service db2 stop
# service STConsoleServer_DM_was.init stop
# service STConsoleServer_NA_was.init stop
# service STConsoleServer_was.init stop
(Note: Using the GUI WAS menu items won't work if you are not logged into the server as wasadmin.)
Confirm stopped with:
# ps -ef | grep java
You can also kill via the following:
kill -9 pididnum
( Note that your grep java will show up in these results. )
previous page
|