Start your Mac's Mail (iMail) application and perform the following:
If this is the FIRST account, you will get guided series of screens instead. Use Option A's steps instead of Option B's steps.
If you already have this mail application being used for another account use Option B's steps.
Option A - First Account Wizard Set-up:
Follow the screens below as a guide. Replace your specific server and account information with the generic examples within the screen grabs.
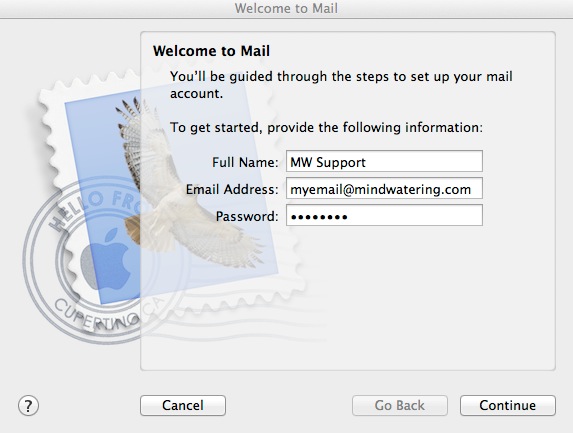
Full Name: Enter the display name of the person for the e-mail account being set up.
E-mail Address: Enter your e-mail address or login ID.
Password: Enter the password we gave you during your setup.
Click Continue.
You may skip the next two screen if the Mail program auto-guesses everything correctly, if not complete the next two screens:
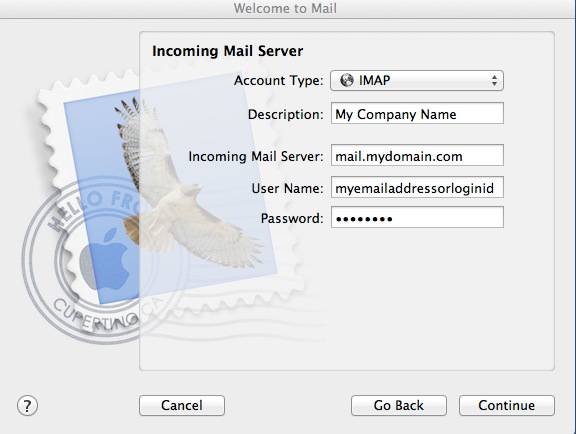
Description: Enter your company name or the name you want to see displayed for this account.
Incoming Mail Server: Enter your domain with a ".mail" in front. (e.g. mail.mydomain.xyz. Substitute your domain with mydomain.xyz.)
User Name: Enter the account e-mail address or login ID.
Password: Enter the account password.
Click Continue.
If you get a message saying that it cannot confirm the server's identity, check your Incoming Mail Server field and proceed anyway, if correct.
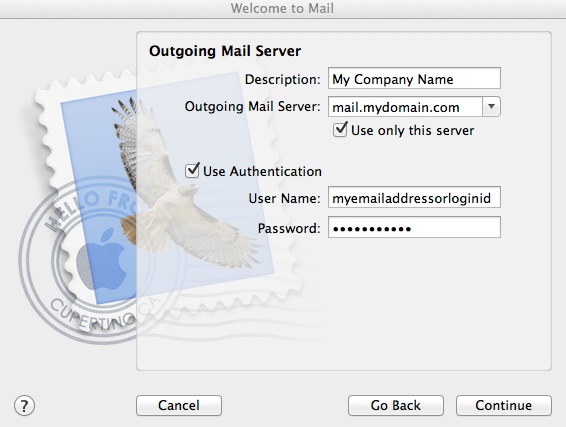
Description: Enter your company name or the name you want to see displayed for this account.
Outgoing Mail Server: Enter your domain with a ".mail" in front. (e.g. mail.mydomain.xyz. Substitute your domain with mydomain.xyz.)
Enable the Use Authentication checkbox.
User Name: Enter the account e-mail address or login ID.
Password: Enter the account password.
Click Continue.
If you get a message saying that it cannot confirm the server's identity, check your Incoming Mail Server field and proceed anyway, if correct.
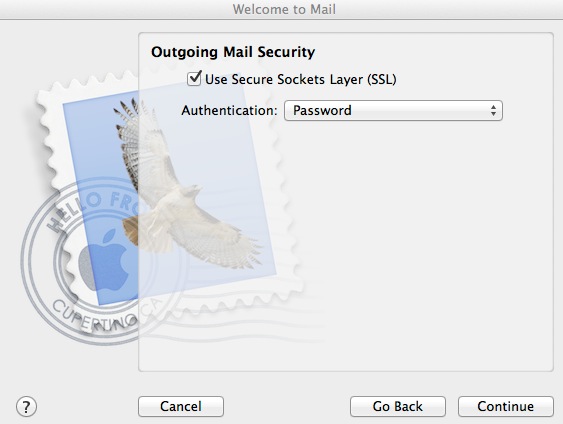
If you are using OS X 10.8, and get a message that the SMTP server is not responding, deselect the checkbox option Use only this server and click Continue again. You will have an extra screen to complete. We are working around a bug in the application. (It actually doesn't seem to matter if you start out selected or not selected for this box - it fails. So you toggle the selection and continue to get to the next screen.)
At the next screen, confirm the settings and click Create.
_____________________________________________________________________________________________
Option B - Additional Account Set-up
1. Go to your Mail menu and click on "Preferences...".
2. In the Preference dialog, click the "Accounts" icon and click "Create Account".
3. In the account type, select the desired type of IMAP or POP3.
(Note: Mindwatering supports both IMAP and POP3. They both have different benefits. IMAP is server-based mail and POP3 is client downloaded mail.)
3a. In the Description field, enter the name you want to see for this mail account. (Most people enter their name or the business name.)
3b. For the Incoming mail server field, enter your domain with a ".mail" in front. (e.g. mail.mydomain.xyz. Substitute your domain with mydomain.xyz.)
3c. For the User Name field, enter your e-mail address or login ID.
3d. For the Password field, enter the password we gave you during your setup.
3e. For the Outgoing Mail Server (SMTP), this next part is a little more complicated. We allow authenticated outgoing mail through us from our clients. HOWEVER, most ISPs (Internet Service Providers) block outgoing mail from going through their servers as it is a great help in deterring spammers from within their networks. You may need to enter your ISP's outgoing SMTP mail server, your id with them, and your password for that id for the outgoing mail server.
Notes:
- Mindwatering supports ports 25, 587, and on our older servers, 465. SSL is enabled on the shared servers w/a self-certified SSL certificate. You will have to take the option to proceed anyway at the "server identity cannot be verified" warning.
- All outgoing mail must be authenticated with a user name/e-mail address and password.
- To change the outgoing port, SSL on/off, or the username and password, select Advanced option --> choose Account Information tab --> select Outgoing Mail Server (SMTP) --> select Edit SMTP Server List... --> Highlight the outgoing account being used (by the description originally entered) --> Underneath, select the Advanced tab, and update the settings desired.
- For those Mindwatering clients who have purchased SSL security, you can choose to access your mail security. (We recommend that you enable SSL when available.) These and other options are under the "Advanced" for the older Mail clients and "Account Options" in the newer ones. Those with purchased SSL certificates will not get the "server identity cannot be verified" warning dialog.
4. If this is not the only mail account, verify that this new one is included when you "Get New Mail".
4a. Open back up this account's settings (if closed), and click the "Include this account when checking for new mail" in the Account Options pane.
previous page
|